Using rsync to deploy to HostGator

Deploying my generated site to my HostGator shared server now is just a matter of using rsync in Terminal to sync my local repository’s dist directory contents to the remote server’s public_html directory. Something like this:


rsync -avz --progress --partial -e 'ssh -p 2222' ~/path/to/dist username@domain.name:/path/to/public_html/

Here’s an explanation of the rsync command.

For quite a while, my personal site deployment process was still old school file transfers over FTP despite using continuous integration tools like Hudson and Jenkins at work. I eventually got around to setting up a PHP web hook when the site’s code base was kept on BitBucket. This was great when my entire repository basically was all the HTML, CSS, JavaScript files needed for the site.

With my site morphing from a dynamic site with very static content to a pretty much static site with some PHP, setting up PHP web hooks on the Github repo wasn’t quite suitable for me this time. I only need the generated files that my Gruntfile’s assemble task puts in the dist directory every time Grunt runs.

With rsync, since I can change what goes where on the fly whenever I need to do a deploy, I could have a subdomain called test.kopijunkie.net that points to a test subdirectory which has a version of my site with new features from another branch of my site’s Github repository. Handy for testing things out stuff in the production environment before being deploying to the actual site.
KopiJunkie.net Assembled

So here we are at 2015. And here it is, the finished product of my tinkering (which I blogged about earlier in 2014). Though by “finished”, what I really mean is it’s finished for now. As I’ve since thought of more things to tinker around with on KopiJunkie.net. But, in (informally) keeping with Agile development practices, here’s my retrospective on the process.

Moving my site’s front end structure from a PHP-based structure to Assemble (hence the name of this blog title!) was fun and interesting. But I discovered that using Assemble to support blog posts also requires more work than I had/have time for right now to make the user experience more on par with what WordPress can offer for a blog reader. I am quite interested in Ghost though and am looking into using that for the blog part of my site (as I type this, I am using WordPress to blog this thought).

For the CSS/Sass side, I really liked working with Bourbon and Neat as I had a lot of control over the style and layout structure of the site. My CSS needs for my site is pretty basic and something lightweight was more appropriate than going all out with something like ZURB’s Foundation or the popular Bootstrap frameworks or even Compass for the Sass mixins I would need. I’d say there is a fair amount of Sass code to write still with Bourbon to get all the functionality, helpers, components that Foundatdion, Boostrap or Compass offers. But you do get complete control over the site’s Sass-iness.

Another thing I was tinkering around with was hooking up the code from Github to be deployed using Travis CI for continuous integration (CI) to a bucket on Amazon S3 which is accessible at kopijunkie.me. In all honesty, this was done more for me to get some hands on experience with CI and Amazon Web Services. But as S3 is only intended to host static web sites this did mean that my contact form, the only part of my site now that relies on PHP, wouldn’t and doesn’t work on kopijunkie.me unfortunately. Of course, an alternative solution to this would be to embed a form created on Wufoo online form builder.

Now if you’ve been looking at my Git commits or the Travis builds, you’d notice that I’ve been having some problems with getting my JavaScript code to run on the S3 hosted version of my site. Annoyingly, I had just discovered last week that it was because the concatenated JavaScript code is somehow missing one of the files it is meant to include despite being within the comment block that grunt-usemin relies on to work out what files need to be concatenated. So that’s still on my TODO list to be sorted out for now.

Grunt Timekeeping

Recently I added a Grunt plugin to the front end workflow we have at work that handily displays a summary of the time taken by a project’s Grunt build tasks. Before this the team had only been aware of the overall time taken. Especially with LiveReload running, waiting for the page to reload with our changes.

We suspected the Compass compilation was taking “a long time”. But we didn’t know for certain how long and if that was the only problem area. With time-grunt we could now see a nice breakdown of each task’s time taken allowing us to know what to focus our performance improvements on.
Continue reading

Autumn 2014 Update

So for the past couple of weeks I have been busy doing some rather major refactoring work on KopiJunkie.net’s code.

I’m bringing my front end workflow up to date with modern front end development. I have to admit I don’t work with PHP much. In fact, the back end language I work with the most in general is Java. With some SQL (specifically, I work daily with MySQL databases). Actually, I’m not sure why I mentioned that as I will still be keeping some of the PHP functionality in the end.

Anyway, what is really happening is I am getting the site to not be dependent on PHP for the site’s content generation, i.e. the front end. In its place I’m going to be using a static site generator (namely Assemble) to generate the static HTML pages. There’s a fair bit more work that’s also happening with JavaScript.

But for now, while the work’s still in progress and I’m developing in the open with the code on GitHub, feel free to have a peek at what’s happening at the repo.

My Front End Development Setup – 2014 edition

My front end development setup is an evolving organism, which changes, grows, evolves as time goes by based on what’s going on in modern web development. When I first started designing and building websites, I worked on a Windows machine hand coding my HTML and inline styling on plain old Notepad. This eventually changed to (still) hand coding HTML with externalised CSS, but using Notepad++ on a Windows machine (I wasn’t very sold on the Apple OSX user experience still at the time), which I loved using for the plugins that powered up what would otherwise be just another Notepad software.

These days, I have so far worked on a Windows PC at work but outside of the office I’m much happier using my MacBook Pro laptop. And I’m fine with this arrangement. Since it means I still have to be familiar with the quirks of both the Mac and PC worlds beyond just the browser differences between IE and Safari and all the other browsers out there in the wild.

But with that in mind, here’s a run down of tools (that aren’t browsers) that I use for my front end development workflow – most of which are available on both Macs and PCs…

Continue reading

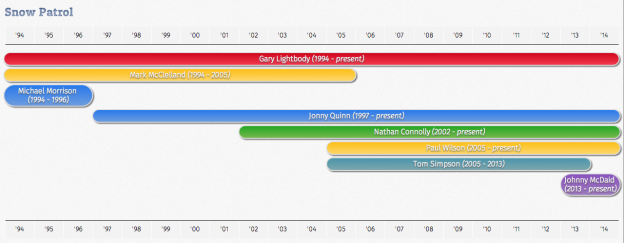
Screenshot - CSS & JS Timeline Chart

CSS, JS Timeline Chart

Finally settled on something to write for my first post. So here it is – a timeline chart made with pure CSS and JavaScript. The actual timeline chart is viewable on theĀ working demo page itself. The code is available at my GitHub repo. Here I’m detailing my thought process, logic for what I’ve done.
Continue reading

Hello World!

So here we are…my first blog post after setting up WordPress on KopiJunkie.net. Woohoo!!!

In the interest of quickly setting things up, I’ve gone with a stock template for now. Bit of a contrast between my site’s overall colours with this very black & white theme (ok, quite a big contrast), but I liked the overall look & also how the responsive design has been executed. I’ll probably be customising it a bit to get it to fit better to keep a consistent look & feel.

Talking (or writing) aloud to myself aside, the master plan is to make my own, of course. After all, I am a front end developer by trade.

To be honest, Tumblr might have been sufficient for a simple blog, which I think will be the case for me. But WordPress is more fun to play around with.

A proper blog post will follow…once I’ve decided what to write about first.